Free Dynamic DNS Service
Reach your home, office, or lab network even when your IP changes.
DNSExit Dynamic DNS points a hostname on your domain to your current public IP address. Use it for self-hosted websites, VPN access, remote desktop, cameras, NAS devices, home labs, and small office networks.
Example: home.yourdomain.com
Your hostname follows your changing public IP, so you do not have to remember numbers or manually edit DNS records.
Self-host services
Run a website, app, game server, NAS, or home lab service from an internet connection with a changing IP.
Remote access
Connect to VPN, remote desktop, cameras, DVRs, or office equipment with a hostname you can remember.
Router-friendly setup
Use a router DDNS client when available, or run a lightweight update script on Windows, Mac, Linux, NAS, or server.
DDNS follows a changing IP. It cannot create inbound access where none exists.
If your router cannot be changed, port forwarding is unavailable, or your ISP puts you behind CGNAT, the hostname may update perfectly while outside visitors still cannot reach the service. That is when DNSExit Remote Access becomes the next step.
Note: DNSExit does not provide static IP addresses. Dynamic DNS keeps a hostname pointed to your current public IP address so you can reach your network even when the IP changes.
|
||||||||||||||
|
||||||||||||||
How Dynamic DNS Keeps You ReachableDynamic DNS maps a hostname to your current public IP address. When your ISP changes the IP, your router, update client, or script sends the new address to DNSExit so your hostname continues to reach the right network. Tip: Besides the easy-to-use web interface to manage your DNS, we also provide DNS API Document to update DNS records remotely. 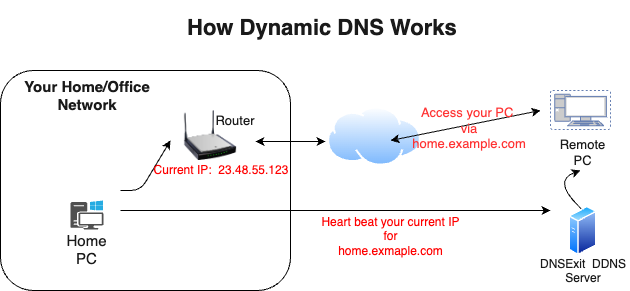
|
How to Start your Dynamic DNS ? |
||||
1. Sign up an account |
||||
|
First you need to Sign Up a free account to create DNS for your domains and updating your IP addresses by IP Update clients. |
||||
2. Register a new or use an existing domain name for dynamic DNS |
||||
|
a) If already got a domain name, you can skip this step. However, you do need to change the name servers of the domain to our name servers so that our name servers are in charge of resolving IPs for your domain. b) To start with your dynamic DNS experience, you may simply use our Free Domains. c) You want to choose your own domain name for your dynamic DNS, you can find an available domain name and registere it. |
||||
3. Create DNS for the Domain |
||||
|
||||
4. Automatic Dynamic IP Updates |
||||
|
Now you need to keep your hostname's IP address updated automatically. There are two ways to do this: Option A: Your RouterMost routers have a built-in DDNS client. We show you exactly what to enter for your router brand. Setup Router DDNSOption B: Curl / ScriptRun a curl command or script on a PC, NAS, or server inside your network. Works on Windows, Mac, and Linux. IP Update ClientsVerify it works: On Windows, Mac, or Linux, open a terminal and run:
nslookup hostname.yourdomain.com ns1.dnsexit.com
The returned IP should match your router's public/WAN IP address. |
||||